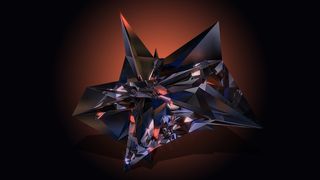
This step-by-step guide will teach you how to create low-poly, facet-style desktop wallpaper with Cinema 4D and Photoshop
Popularised by the great New York-based art director and illustrator Justin Maller,
the low poly facet-style render is easier that you think in Cinema 4D
and Photoshop. If you're new to the softwares, there are plenty of Cinema 4D tutorials and Photoshop tutorials
to get you started. But for those of you who are ready to go, here's a
simple 12-step guide to creating your very own low-poly facet
wallpaper.
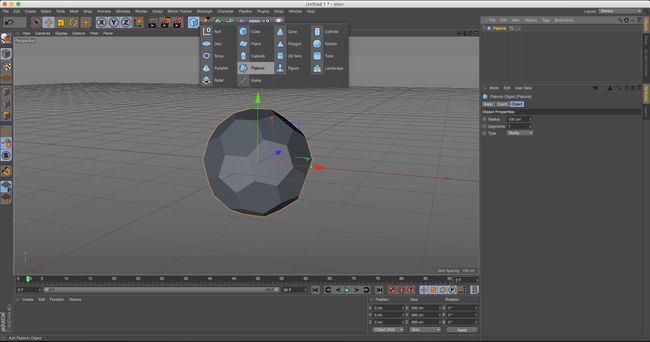
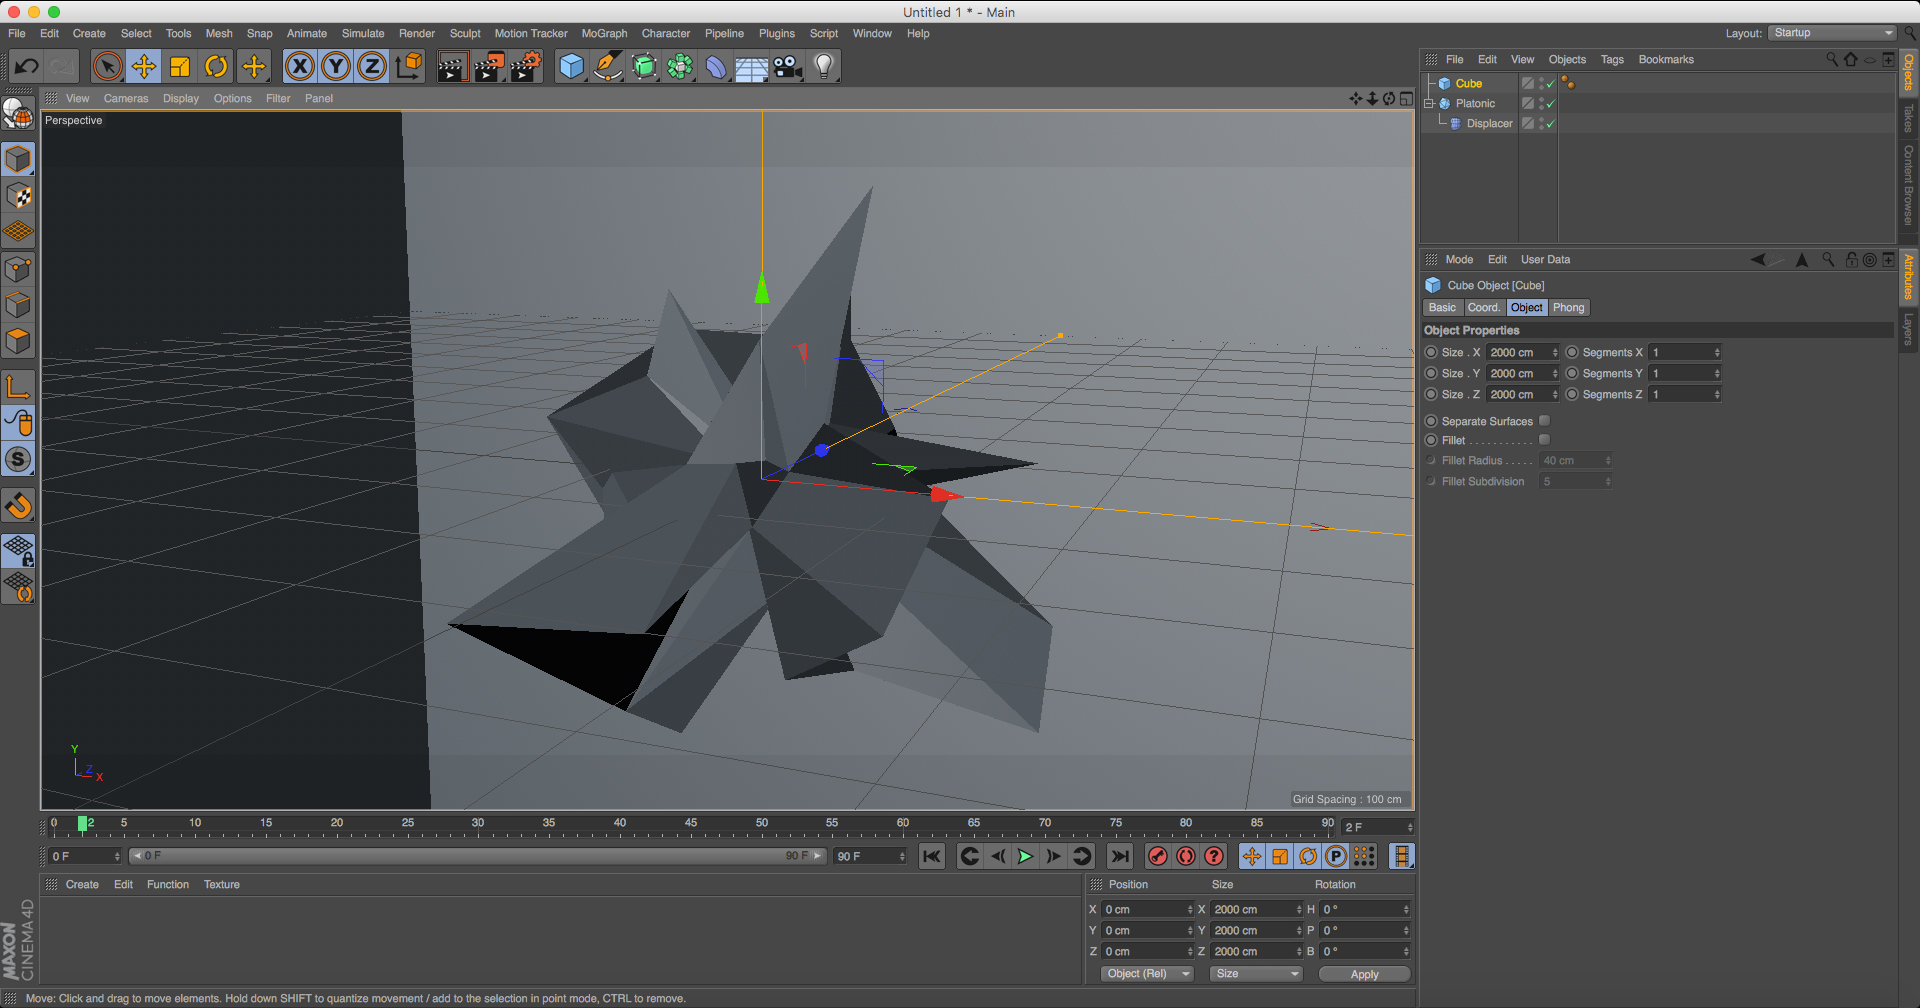
First
off, fire up Cinema 4D and add a platonic shape from the shape menu to
your scene. Select the shape in the objects menu and select the object
tab in the Attribute panel below. Change the type to Bucky.
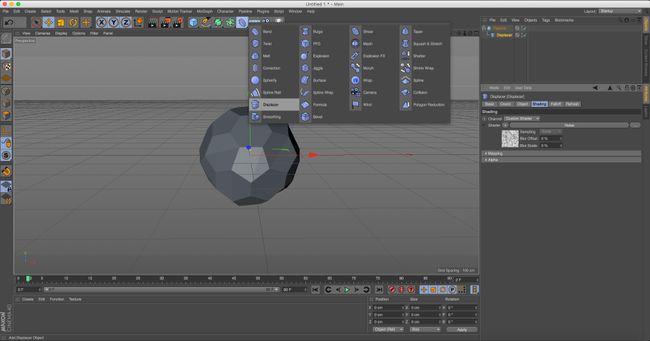
Next,
select a Displacer object. This lives in the same menu as the Bend
object. Move the Displacer inside your Platonic shape in the Objects
panel to make it a child of the shape.
Once
there, select the Shading tab from the Attributes panel below. Next to
the shader, click the little white arrow button to be able to select
noise. Once selected, click the object tab and alter the height. This
will start to create the kind of shapes we're looking for.
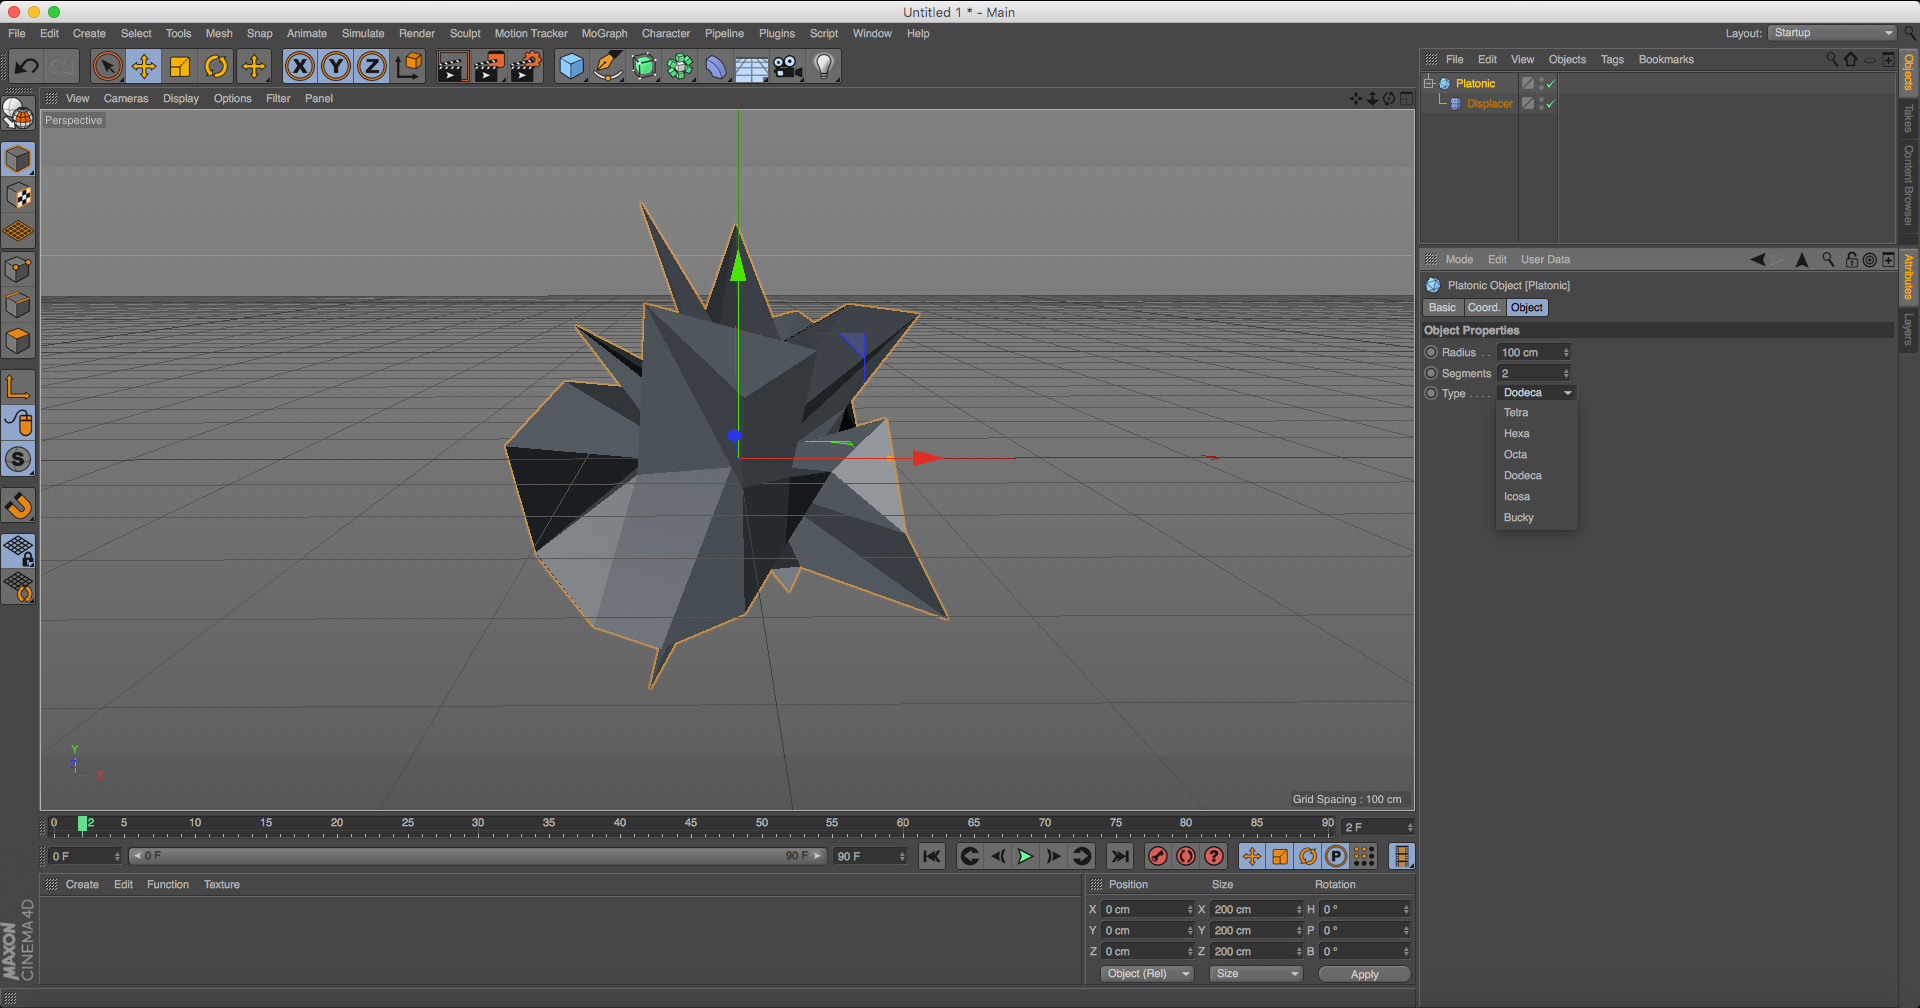
As
well as playing around with the height and noise attributes, you can
also tweak the attributes of the Platonic shape, like its type and
segments. This will give you a more detailed shape. It's worth playing
around until you get one you like.
Next,
we'll need to add another shape to our scene. We'll use this later to
project colour into our Platonic shape. So select a cube and in its
Attributes/Object panel change its X/Y/Z size to 2000cm. This should
surround your Platonic shape and still allow you to see it.
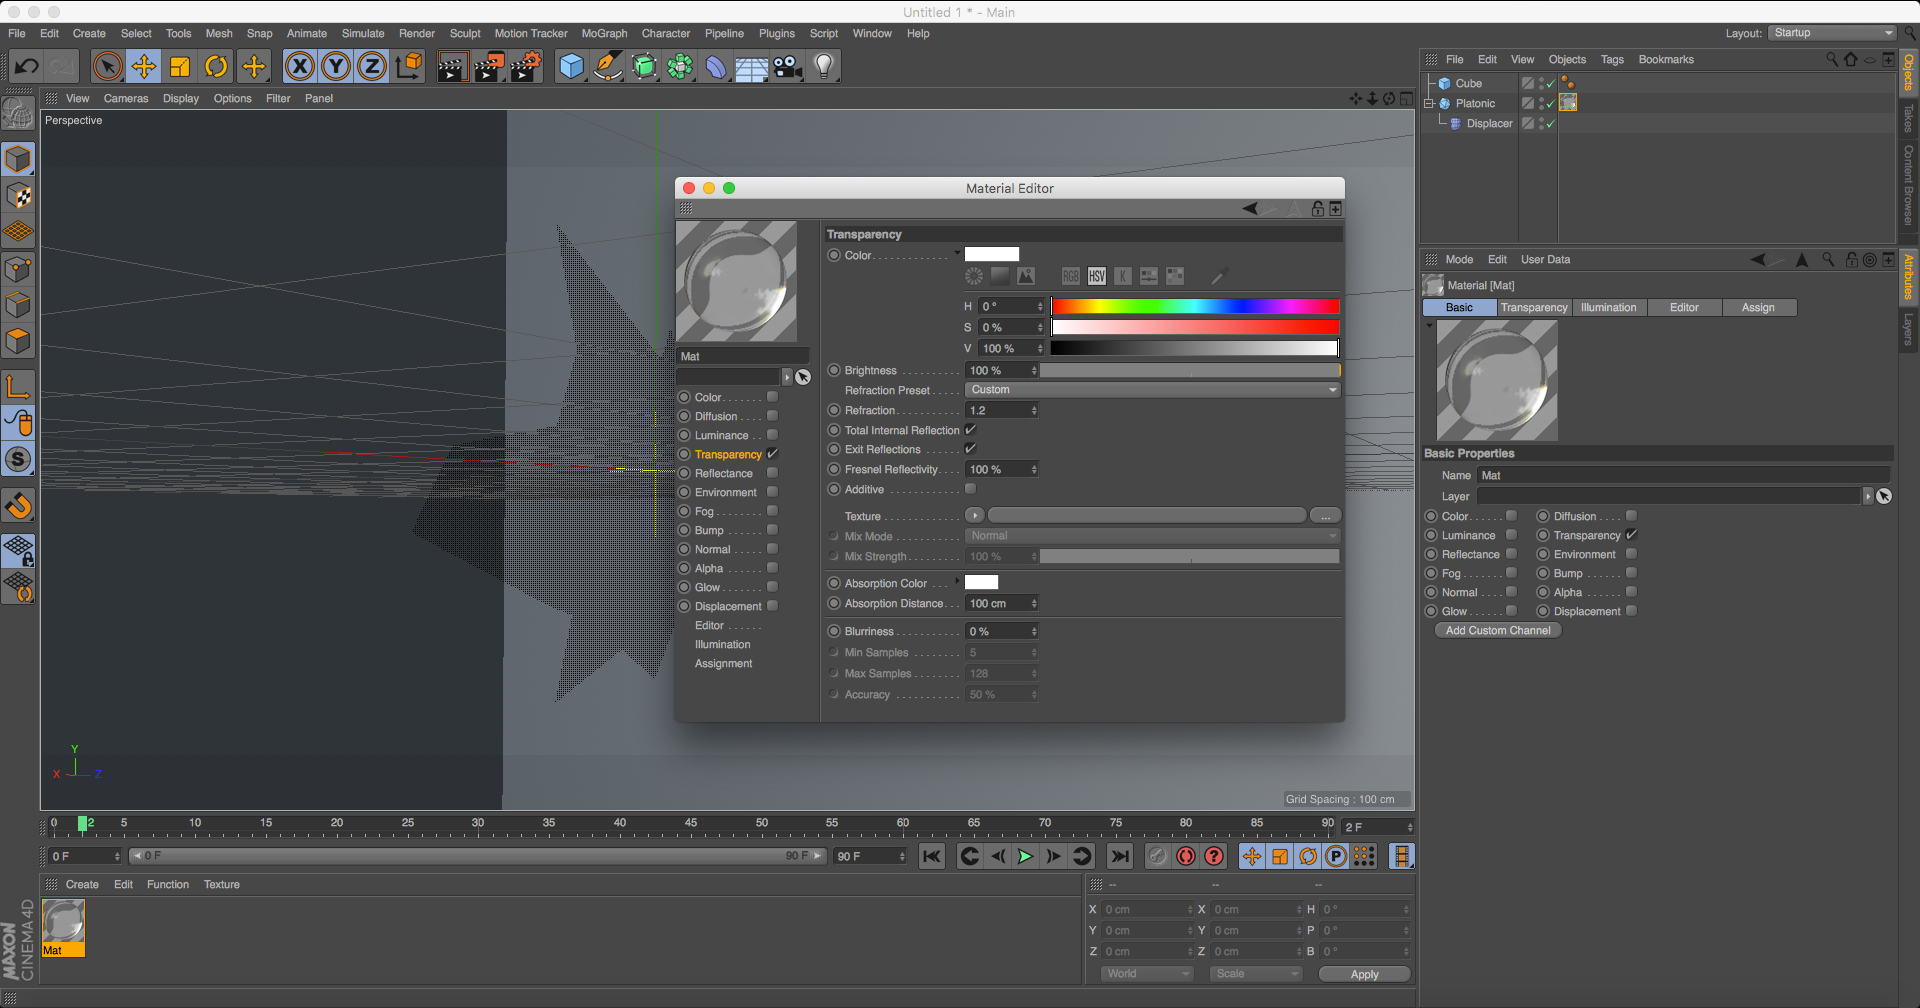
Let's create some materials to apply to our shapes. First, some glass. To do this select Create > New material from the materials panel, bottom left of your screen.
Once
it appears, double-click the material to bring up your Materials
window. On the left-side of the window turn all attribute types off,
other than Transparency. Once selected in the right-hand panel, change
the Refraction setting to 1.2. With the glass created, drag the material
and drop it onto your Platonic shape.
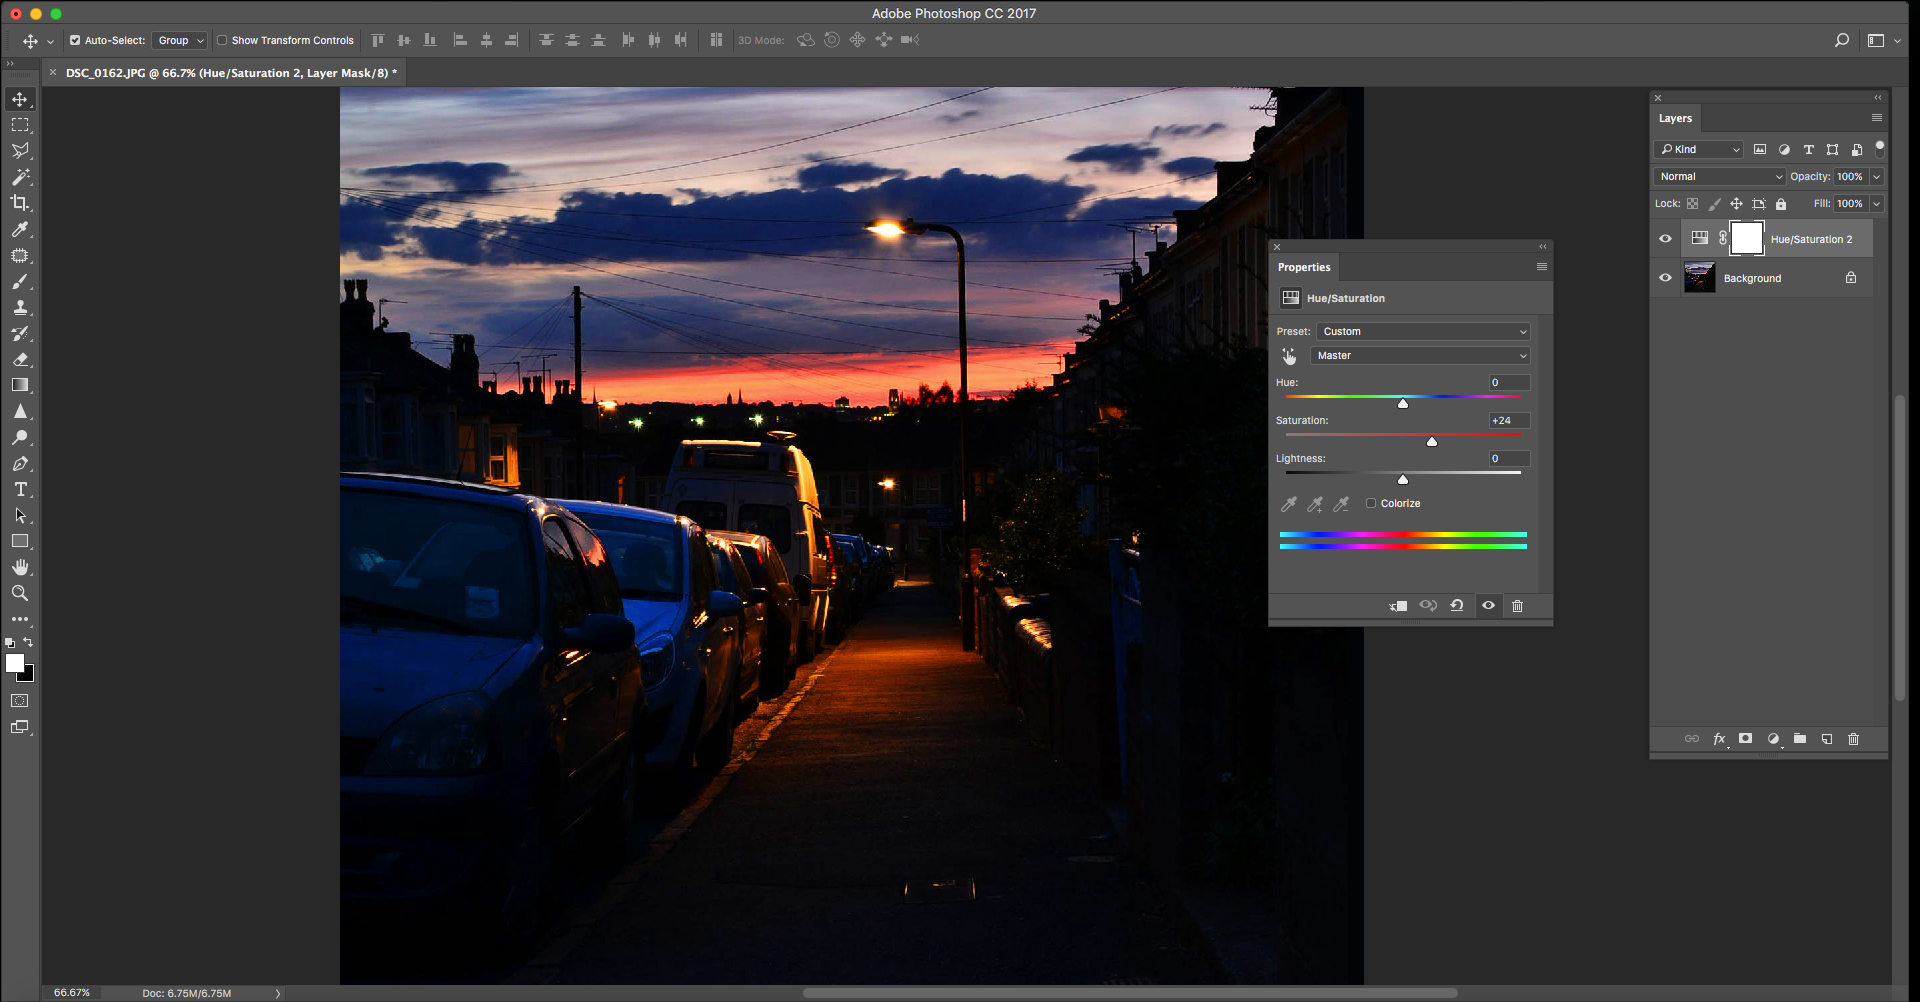
Next,
we'll need to find a photo or image that we'll use to project onto our
shape. I found that darker, high-contrast images seem to work well, as
well as dropping them into Photoshop first and boosting up the
Saturation.
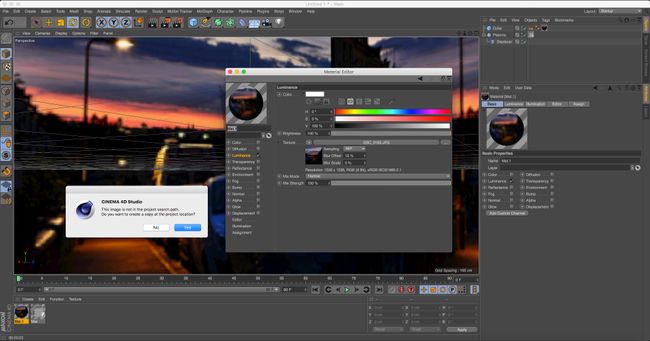
Back
in Cinema 4D, create a new material (as you did previously), but
instead of Transparency, only click the Luminance type. A this point, we
can apply our photo to the material. On the right, click the three-dot
button to the far right of the texture button. Find your image and click
OK.
Cinema 4D might prompt you that it's going to move the image
to the project location. Just click 'Yes' – this will allow C4D to find
it again later. Once applied to the material, alter the Blur offset to
around 15 per cent. Now drag the material onto your cube object.
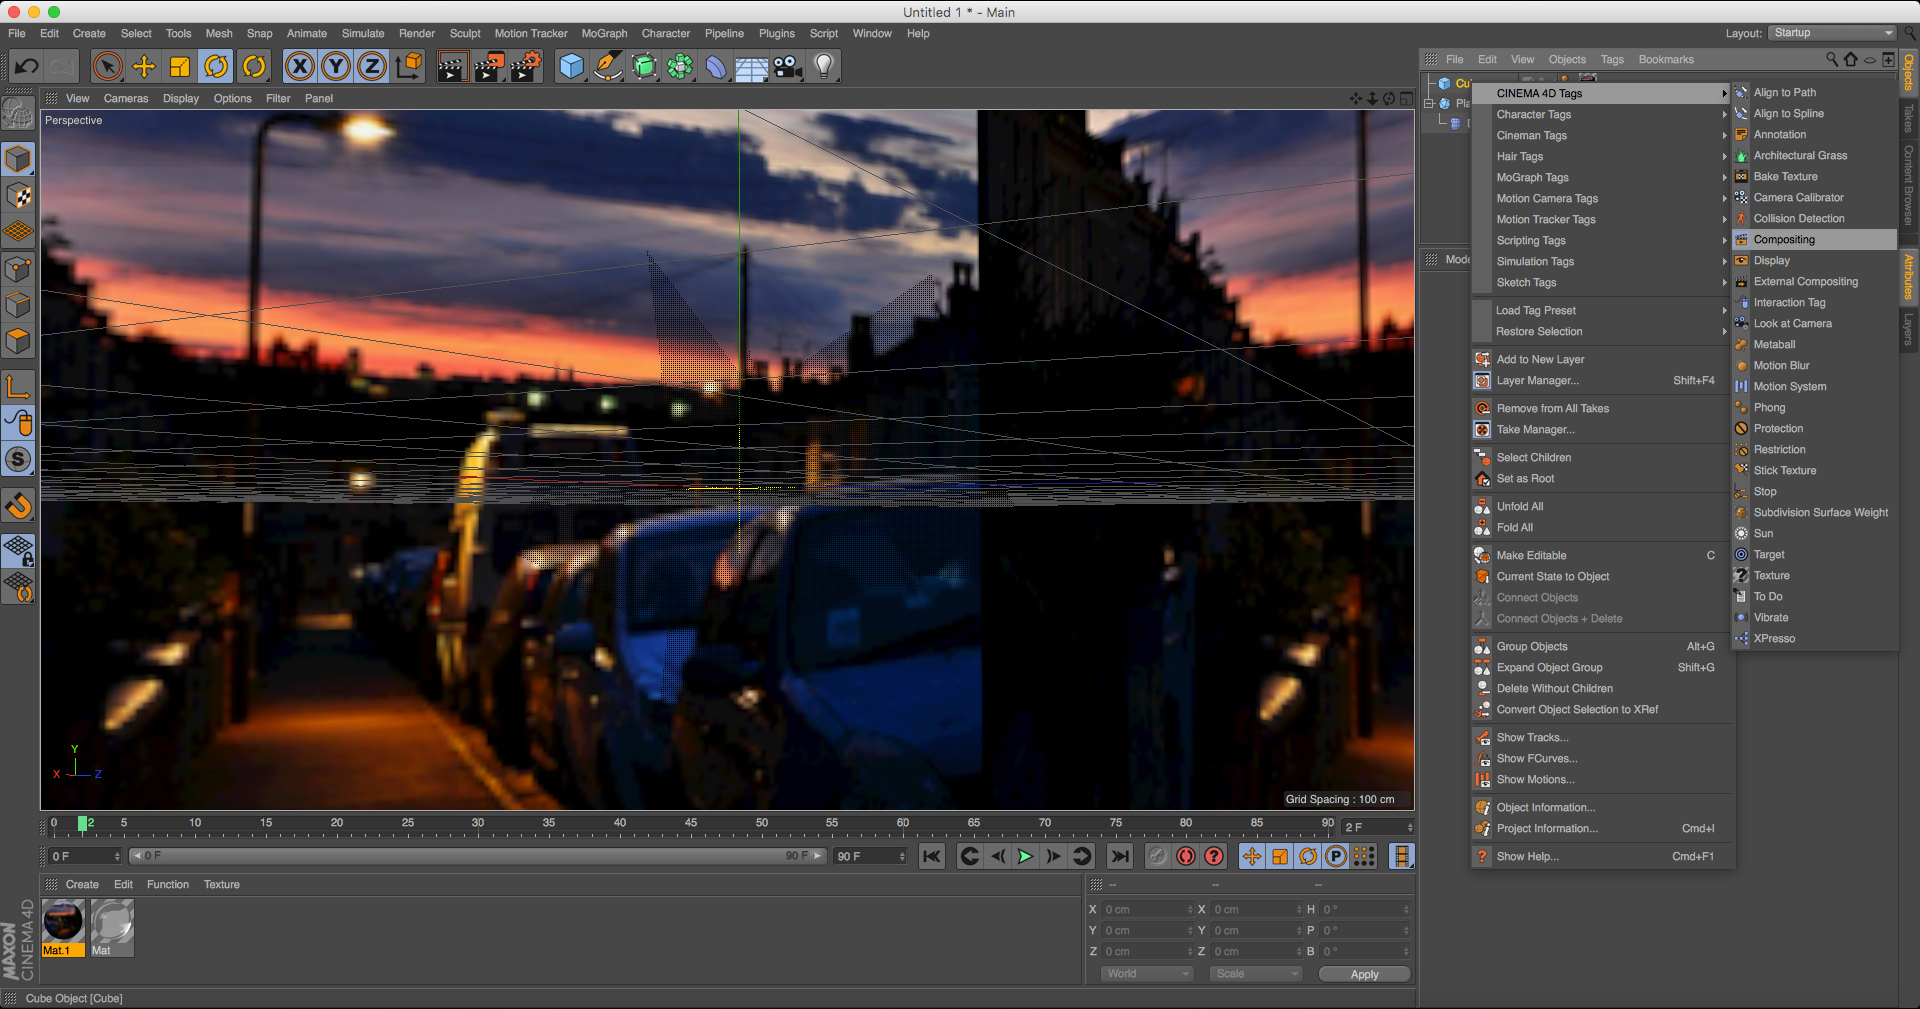
Now
what we need to do is allow the cube to affect the Platonic shape
without it appearing in the scene. This is simple. All you need to do is
right-click on the cube and select Cinema 4D tags/Compositing. Once it
appears in your Object menu, select it and click the Tag tab in the
Attribute menu below.
There
should be a checkbox called 'Seen by camera'. Untick this. It might not
seem like the cube has disappeared, but when you render, it won't be
there.
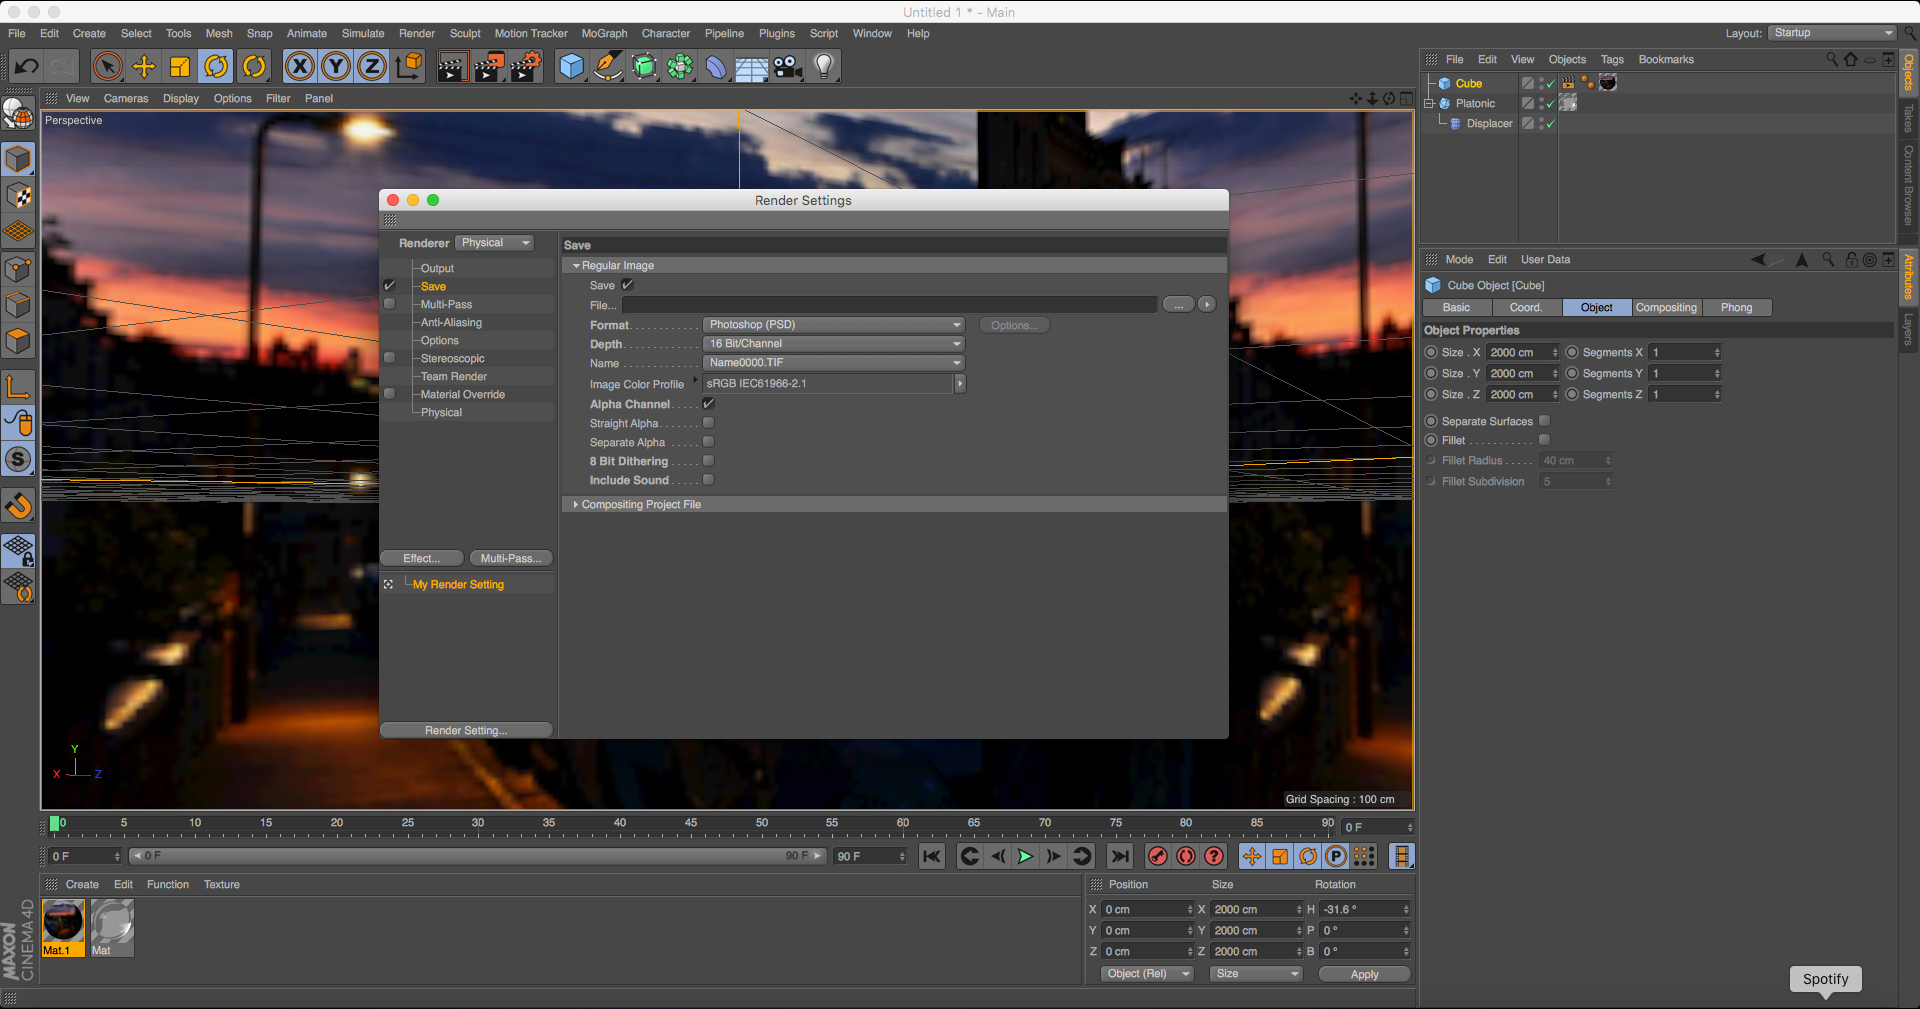
Now
for the final render. Click the render setting button (a clapper board
with a clog) to bring up your render settings window. For the render
button select Physical. In your Output menu alter your width and height
to 1960px by 840px, this should high enough resolution for most
desktops. In the Save menu select Format PSD, Depth 16 bit, and click on
the alpha channel box (we'll use this later in Photoshop).
Once
you've altered your resolution you might have to go back to your scene
and move your camera to position your shape how you want it. You can do
this by using 1,2,3 quick key to move rotate and zoom your camera. Then press shift+R to render your final image.
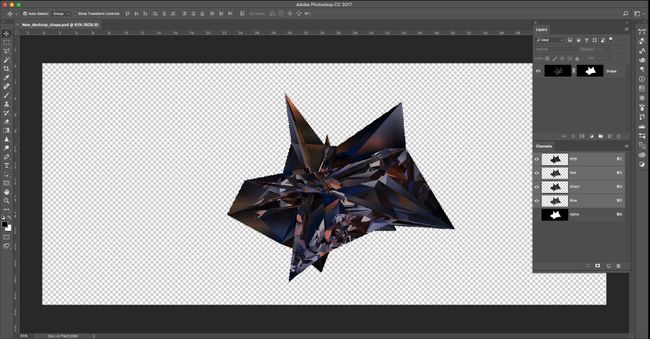
Once
the Picture Viewer has finished rendering, select File/Save as then
open your file in Photoshop. Now for the finishing touches.
In Photoshop open the Channels panel and cmd+click
the extra channel supplied by C4D. With this selection, create a layer
mask in your Layers panel, making your shape sit on a transparent layer.
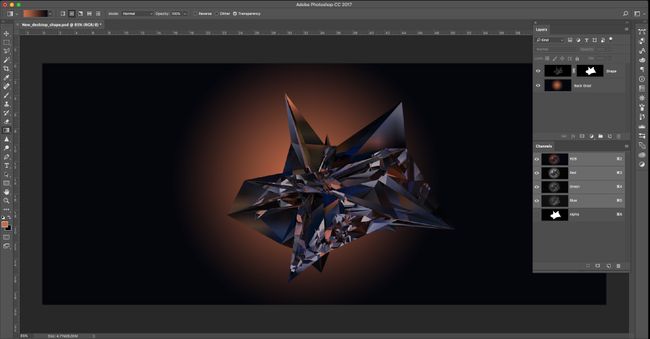
Next,
create a new layer and set this below your masked shape. With the
Droplet tool, select a highlight colour for rendering for your
foreground, and one of the darkest colours for your background. With
these selected use the Gradient tool set to Radial, and draw on a
background.
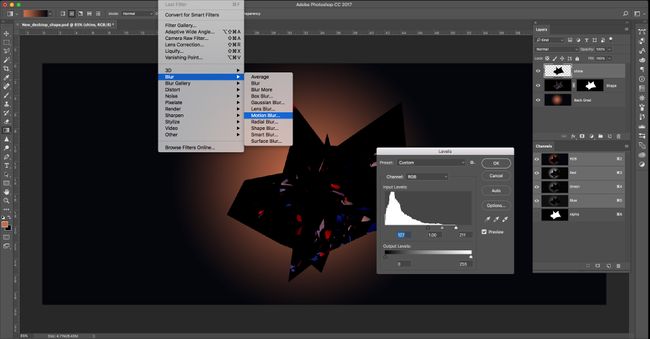
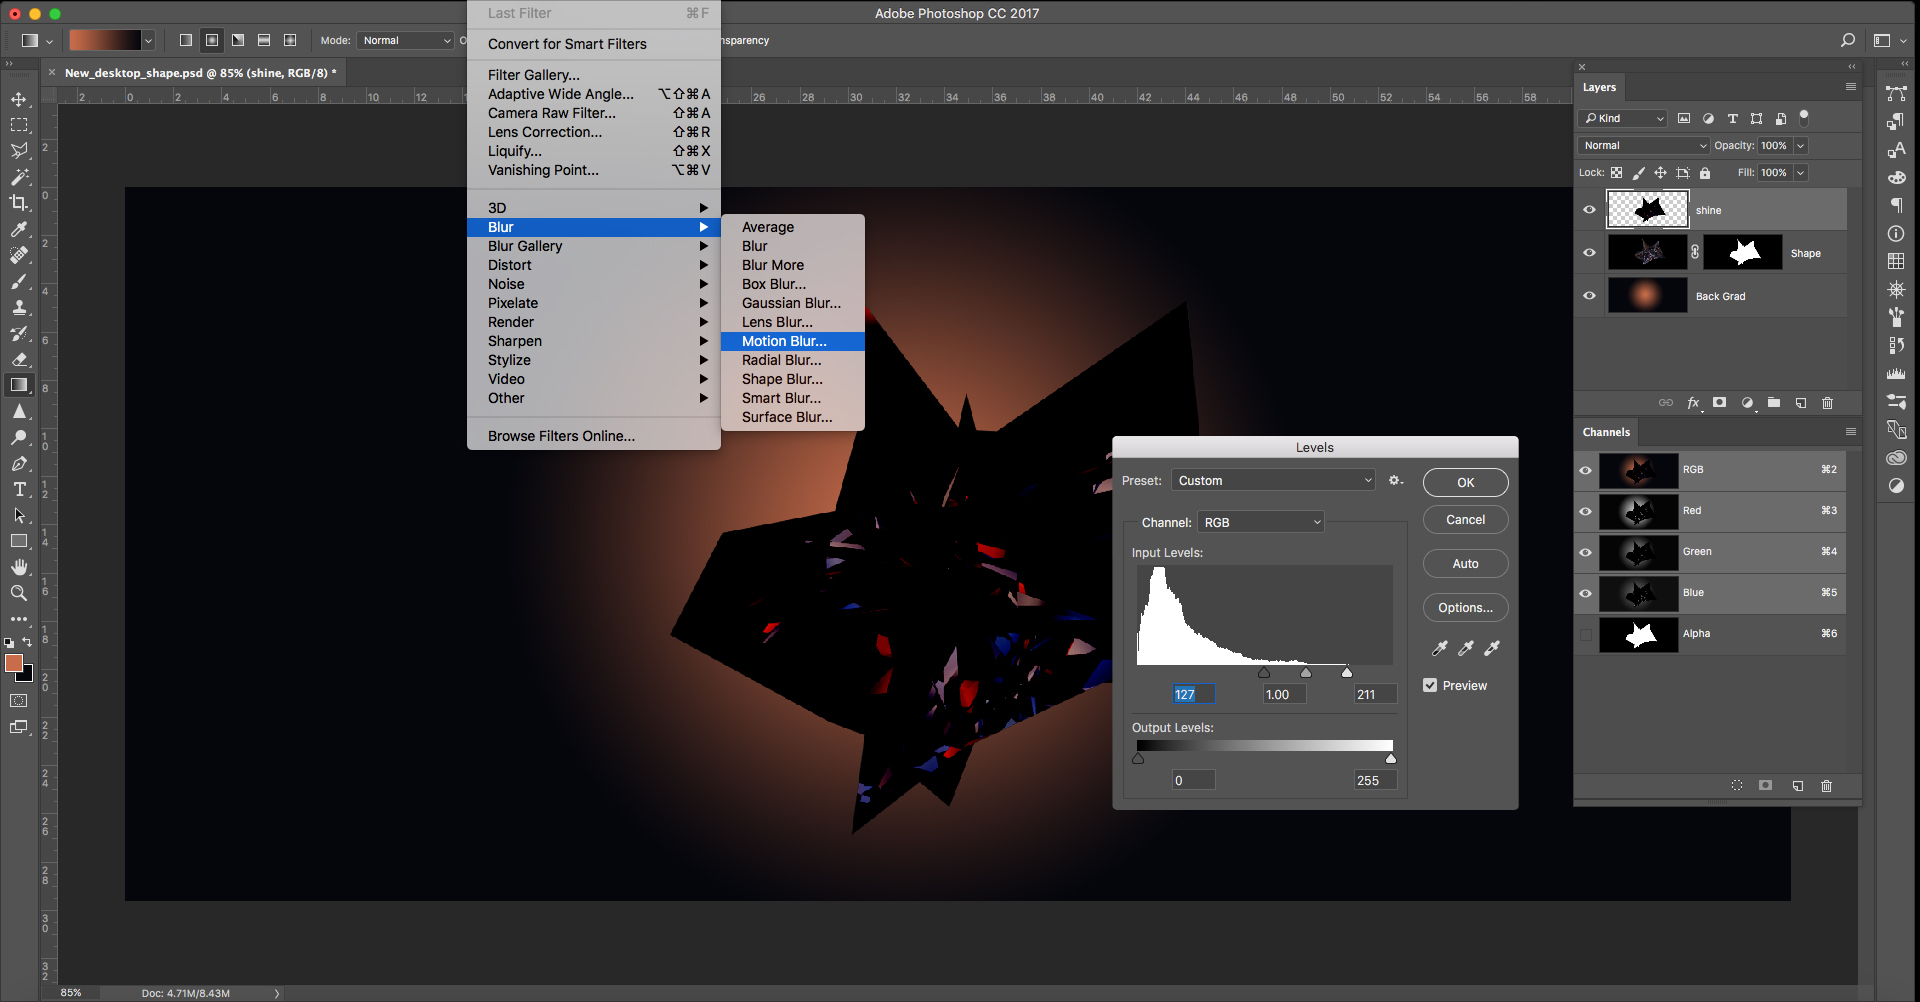
To
add some extra shine, duplicate your shape and right-click the layer.
Apply the mask, taking the background away. Once separated, bring up
your Levels panel (cmd+L). Using the three triangles below the histogram, clip the highlights by moving them to the right.
With
this layer modified, select Filter/Blur/Motion Blur and apply an angle
and distance depending on your shape. Next simply apply Screen Mode to
this layer to give you some more contrast and shine.
One final quick tip: If your shape seems to be a bit floaty, try adding a shadow.
For the most part, I'm a 2D artist. But for the past few months I've
been playing in 3D space – and I love it! It turns out that it can be
helpful to have the skills to create a 3D model , even when the spec calls for 2D art.
In
this article, we'll take a look at some of the reasons why you should
learn 3D, and how it can help improve your 2D art. We'll also review a
few software options, and show you where you can go to get help learning
the art of 3D modeling.
The benefits of going 3D
I
wasn't always eager to work in 3D. In fact, I did everything I could to
stay away from it. I mean, really. What's the point in spending time
creating a 3D model when the spec calls for 2D art? As it turns out, there are a lot of good points.
Let's take a look at some of the reasons why you might consider learning and using 3D:
01. Fine-tune your designs
3D modeling can help you ensure accuracy in perspective, lighting and anatomy
When
you're working in 2D space, it's important to design things with the
basic principals in mind. This includes composition, perspective,
lighting, values and tones, color theory, and form. With the aid of 3D
modeling software, achieving these things has never been easier.
02. Work faster
Granted,
if you're just learning 3D there's going to be a bit of a learning
curve. But once you're past that, you'll discover how quickly you can
model things. More importantly, you'll be able to change those things
when needed, without spending a lot of time doing it.
03. Increase your marketability
Quite
possibly the best reason to learn 3D is to improve your position within
the marketplace. The trend is definitely moving towards the 3D world.
As more and more designs take on a photorealistic look, understanding 3D
will give you a competitive edge.
04. Stimulate your mind
There's
something to be said about learning a new skill. When you take the time
to learn something new, a few surprising things begin to happen.
For
one, it helps to stimulate your mind. It also gives you something to
talk about. This may not seem like a big deal, but it actually helps you
build connections within the community.
05. Boost your creativity
I
know this seems like a silly reason, but having fun is important. Even
if you never plan to use your 3D designs, it's a lot of fun to play
around in the 3D space. If nothing else, it helps you to tap into your
creativity.
3D software options
Now that you know why you should learn and use 3D, let's find out what software options are available:
Creative freedom starts with open source software Blender
Blender
is the de facto standard when it comes to free and open source
software. While I wouldn't say the interface is particularly user
friendly or intuitive, it's not too bad once you learn how to get
around.
The flagship of 3D software is Maya –but it doesn't come cheap
The flagship of 3D software is Autodesk's Maya
– but it's not cheap. If you're not a student, Maya will cost you (at a
minimum) $185 per month. If you're looking for a cheaper alternative,
Autodesk offers Maya LT, which is only $30 per month. The good news is that you can download free trials for both of these products.
Out
of the three of these options, Maya LT is my preferred choice for
creating characters and environments – especially for games.
Note:
The list above is not meant to be comprehensive. It's simply a starting
point. I encourage you to look around and find the right tool for you.
Keep in mind, rarely will you have a single tool for every job.
Learning 3D
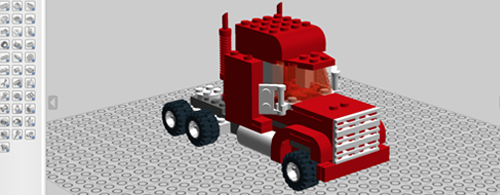
Master the art of 3D with the Lego Digital Designer
OK, so you've decided to learn 3D, and you selected a few tools. But where do you go to learn the basics?
Chris Language at Day Of The Indie suggests LEGO Digital Designer.
He says, "LDD is a great training tool for anyone wanting to learn the
basics behind the 3D authoring tools available today. LDD is also great
for prototyping. Besides, who doesn't like to play with LEGO?". You can
watch Chris' up-and-coming LDD tutorial at Day Of The Indie.
If you're looking for tutorials specifically on the software mentioned above, Blender has everything you need in its tutorial section. Or you can take a look at this list of 38 brilliant Blender tutorials. For Maya, have a look at 22 mighty Maya tutorials to try today .
Hopefully, you're convinced to give 3D a try!
Those who have used Quixel suite for a long time are used to that
inactive, little green button to the right of dDo. But after a very long
period of 'imminent release' chatter, that button went bright green in
September. It now sends you to the Megascans website: Quixel's latest
offering in its series of excellent tools.
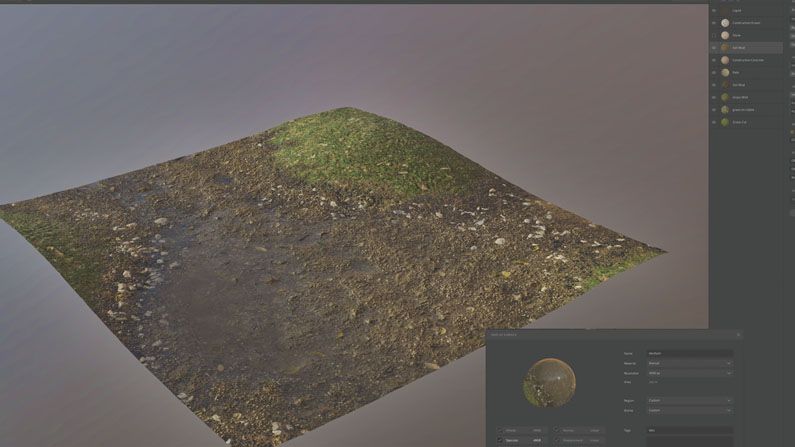
Green is a fitting
colour for Megascans, as it is a website filled with an incredible
amount of biomes, surfaces, 3D scans and atlases – all prepped, scanned,
and ready for use in any renderer or engine, and with a fresh content
delivery rate somewhere between enthusiastic and insane.
In
addition to textures and photogrammetry scans, Megascans also offers the
Megascans Bridge. This is your local downloaded content library viewer,
complete with editable scripts for plugging your downloads into your
renderer or game engine, such as Unity or Unreal.
Megascans
Studio is easy and enjoyable to work with, letting you import, layer
and blend your surface assets to your heart's content
Then
there's Megascans Studio, which is where you bring your content to
life. It's easy and enjoyable to work with, letting you import, layer
and blend your surface assets to your heart's content. It also enables
you to generate complex, multilayered materials using just a few
sliders. You can import your surface(s), add solid or liquid layers, and
then tweak anything from height to opacity, and blend with the
underlying layers.
Finished textures can be exported on a default
or custom/per channel basis, ranging from normal SRGB exports to custom
gloss-containing normals for CRYENGINE and Lumberyard.
The sky
really is the limit when it comes to creative use of Megascans, and
shows Quixel has certainly not been resting on its nDo and dDo laurels.
High quality library
In
order for the Megascans library to work well, Quixel has had to develop
a whole new pipeline for asset scanning and creation. This was no doubt
a huge amount of work, and the resulting content is of very high
quality.
The Megascans library offers beautifully flat surfaces
and atlases for both spec/gloss and metal/rough workflows, as well as
super-honed normals and other maps. This goes for the photogrammetry
models as well: all models have beautifully flat UVs and seamless
textures, and import without a hitch into anything from 3ds Max to Vue.
There
aren't many drawbacks, either. The content library could use even
better sorting, and needs better import and deletion functionality, and
the Bridge UI sometimes hangs. However, considering what you get for
your subscription money and the ease and beauty of the tools themselves,
these are minor issues.
If you've not jumped on the Megascans bandwagon yet, make an effort to do so. It really is that good. This article was originally featured in 3D World issue 215
Pixar directing animator Andrew Gordon has seen a few demo reels in
his time. When he isn’t working on stunning animations at Pixar, he’s
busy sharing industry tips and techniques on his blog, and teaching masterclasses in animation and storytelling (he’s in Rome in May).
Here,
Gordon walks through some stand-out demo reels from the last decade,
explaining why each one won its creator either an internship or a job…
01. Stefan Schumacher: Demo reel 2010
“This
one was done by Stefan Schumacher, who was one of my interns a few
years back,” explains Gordon. “All of the scenes are based on a simple
rig that has been modified to be a character. Also, he put sets in and,
in general, shows really great acting ideas. Especially in the scene at
00:30…”
02. Allison Rutland: 2009 animation demo reel
“Another
reel that I remember being wonderful was this one from Allison Rutland.
It’s a professional reel that showed great potential at the time,”
Gordon explains.
“She didn’t have much feature work on her reel,
but she did two personal tests that got her a job. The last one on the
reel [at 00:50] I think really closed it for her. It’s a great example
of believable acting,” he says. Rutland went on to win an Annie for best
character animation for her work on 2015 animated film, Inside Out.
You can watch her 2017 animation showreel here.
03. Cesar Tafova: Animation reel 2016
“There
are many rigs out there – many are attached to schools that ‘give them
away’ for free as a marketing tool,” says Gordon. “Just know that when
you see the same rig over and over from hundreds and hundreds of
students, it’s very hard to separate yourself from the pack.
“This
example [at 00:17] shows a good use of changing the scene and
character. It has a good hook. It’s the Malclom rig,” he adds. “I see
lot of demo reels with this guy. If you’re going to use a rig from a
school, come up with a really original design and test.
“Look at
the rig as the actor, and you as the director who needs to put him in a
costume. Make the scenery and direct the acting to tell a story.”
04: Carlo Vogele: For Sock’s Sake
“Once
you get past the work from schools that teach animation by using stock
rigs and running you through animation exercises, the stuff that really
stands out is the student films from other schools in the world,” says
Gordon. “When you see a film that’s well-crafted, it means a lot. This
film by Carlo Vogele was one of those you see and, right off the bat,
you say: ‘That’s a great idea – using clothing to animate.”
Don’t fall into the trap of being a shot animator. Try to be a storyteller
“It’s
so important to remember to be a film-maker and not just try to do
exercises that you think will get you into this or that studio –
especially when you’re a student. Now’s your time to make films, because
not many people out there are going to give you the money to make a
film.”
“I was personally hired out of school on a two-minute
Flour Sack test that turned into a little story. I saw another student
get an internship based off his Flour Sack film and go on to Pixar, then
Disney feature animation,” he continues. “You don’t need complex rigs
to get noticed. Just great ideas. Many times it’s the story telling, the
entertainment value, what you bring to the work… Don’t fall into the
trap of being a shot animator. Try to be a storyteller.”
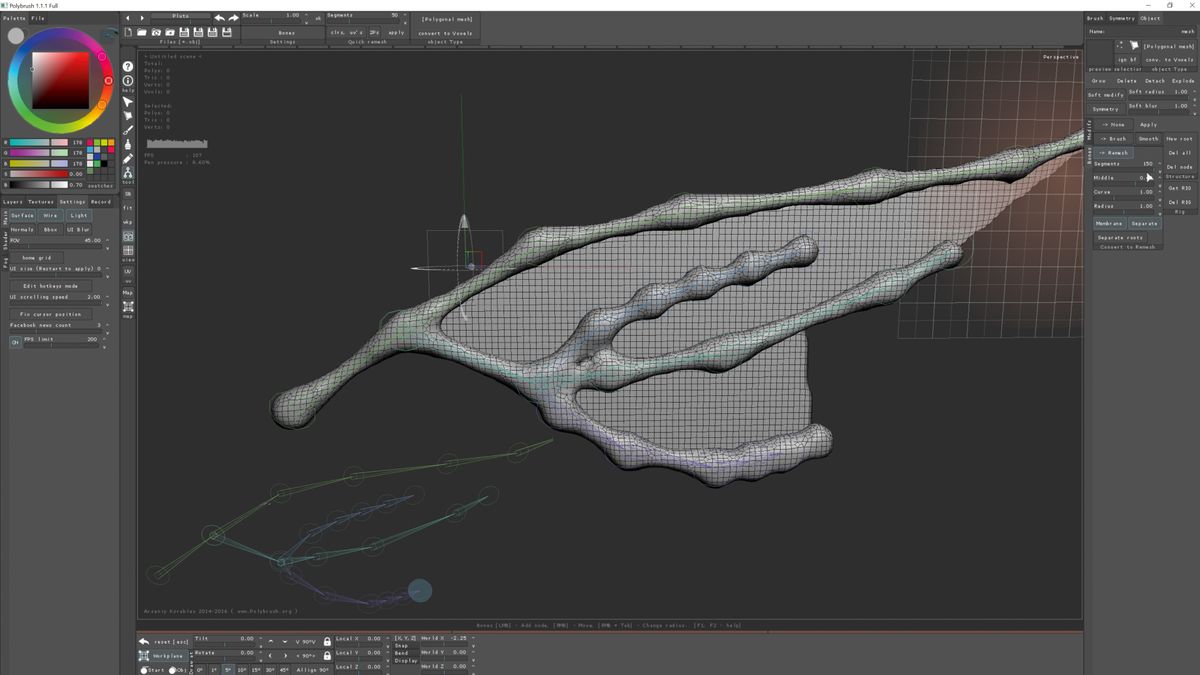
Polybrush is a new, small sculpting tool that lets you sculpt mesh
via sketching or drawing with your mouse or tablet. The brainchild of
Arseniy Korablev, it lets you create new, use defined, or refined
meshes, with a brush containing just one or lots of different elements,
each with their own parameters.
Reminiscent of Groboto in its
heyday, or Sculptris, the software enables you to quickly sculpt and
paint anything from plants to creatures to hands – with some serious
kitbashing options thrown in, provided you take the time to set up your
object files for brush import and painting.
In
addition, it comes with a pretty big set of functionality for such a
small tool: As well as the generic 3D sketching tools, you get
sculpting, lathing and voxel tools, as well as the kind of simple
remesher Sculptris never seems to get around to implementing. Not to
mention the big library of ready to use object files which you can
incorporate in your sculpts. It even comes with deforming, boning and
simple UV tools.
It’s
easy to use, too, once you figure out the UI, which could be a lot
clearer: settings and pickers are on the left, menu and complex options
are on top, and configurable scene items sit on the right, together with
sculpting and creation tools.
Creative fun
You
then proceed to sculpt, paint or add items to your model. One thing I
found a little clunky was having to deal with the plane that comes with
the 3D painting brush, but once you get used to it, it’s par for the
course, and doesn’t detract much from the fact that Polybrush is a super
fun and easy tool to use for tweaking sculpts, generating new ones, or
even creating bones. Polybrush is especially good if you’re on a budget
(for example, when you can’t afford to use ZBrush).
Of course, it
doesn’t sport all the tools of ZBrush, but combined with Sculptris and
Blender, this little tool can garner you some very nice results indeed.
The one thing I loved about Polybrush 1.1 is how it invites you to
explore, create, and simply have fun.
Which is why it’s a pity
that it has a few detractions. First of all, be prepared to spend some
time figuring it out, as Korablev’s videos are very pretty, but not
exactly informative on finer details. It’s also a little unstable on
Windows 10/64, and anti-virus software such as Norton keeps deleting it.
But
if you’re willing to deal with its quirks, and are looking for that
extra, cool little tool for your toolkit, $20 isn’t much for what it can
do, plus the fun you’ll have exploring it.
This article was originally published in 3D World magazine issue 215


